유튜브 강좌 : https://youtu.be/M1e2tLnzVPo
워크북
Navigation Controller: Container View Controller이므로 내부적으로 다른 컨트롤러를 포함하고있다. Controller 끼리의 화면이동을 처리해주고, 현재 위치에 대한 네비게이션 역할을 한다.

Navigation Stack: Navigation Controller는 child view Controller를 stack 형식으로 가지고 있다. 첫번째 View Controller는 root view controller가 되고 stack에 가장 아래에 위치하게 된다. 마지막에 있는 요소는 현재 보여지고 있는 view Controller를 의미한다. segue나 다른 메소드를 이용해 view controller를 추가 또는 제거할 수 있다.
root view를 제외한 모든 view는 뒤로가기 버튼을 제공한다. 사용자의 화면에 navigation bar에 back 버튼을 누르는 경우 가장 top에 있는 view controller를 제거하는 것과 동일하다.
Stack 구조를 이용하여 View Controller를 쌓고있지만 현재 보여지는 화면은 1개이다. 따라서 Debug View Hierachy를 통해서 확인할 수 없다. 이전에 있었던 View Controller가 화면에서 사라졌지만, 메모리상에는 계속해서 남아있는 상태이다.
요약! : Navigation View Controller는 View Container 중 하나로써, 스택을 기반으로 view controller들을 관리하는 controller이다.
배운점: selection에서 question으로 뒤로가기를 할 때 add action으로 구현을 했는데, 그럴필요없이 stack에서 현재 view를 pop하면 된다.
add action과 관련된 블로그 ->
Android Navigation Component 개념과 튜토리얼 — 1
Jetpack과 함께 소개된 안드로이드 네비게이션은 기존 정말 복잡하고 난해하고 코드를 스파게티로 만들어줬던 Fragment와 Activity간 구현을 심플하고 안정적으로 이동할 수 있도록 도와주는 컴포넌
medium.com
Button click 구현
View.onClickListener 인터페이스로 구현할 수도 있다.
    override fun onClick(p0: View?) {
        when(p0?.id)
        {
        R.id.btn_next-> {
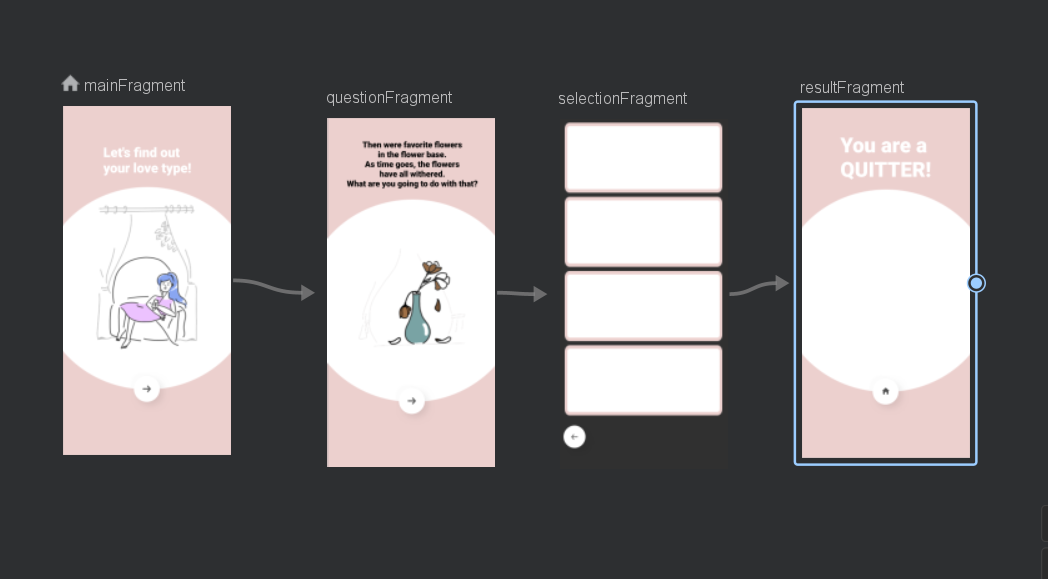
            navController.navigate(R.id.action_questionFragment_to_selectionFragment)
        }

        }
    }
Selection 선택부분 구현
class SelectionFragment : Fragment(), View.OnClickListener{

    lateinit var navController:NavController
    override fun onCreateView(
        inflater: LayoutInflater, container: ViewGroup?,
        savedInstanceState: Bundle?
    ): View? {
        return inflater.inflate(R.layout.fragment_selection, container, false)
    }

    override fun onViewCreated(view: View, savedInstanceState: Bundle?) {
        super.onViewCreated(view, savedInstanceState)
        navController = Navigation.findNavController(view)
        btn_back.setOnClickListener(this)
        option_1.setOnClickListener(this)
        option_2.setOnClickListener(this)
        option_3.setOnClickListener(this)
        option_4.setOnClickListener(this)
    }

    override fun onClick(v:View?)
    {
        when(v?.id)
        {
            R.id.option_1->{navigateWithIndex(1)}
            R.id.option_2->{navigateWithIndex(2)}
            R.id.option_3->{navigateWithIndex(3)}
            R.id.option_4->{navigateWithIndex(4)}
            R.id.btn_back->{
                navController.popBackStack() //nav 작동은 stack처럼 한다. 따라서 이전 화면으로 되돌아갈때는 가장 상단 view를 pop한다.
            }
        }
    }
    fun navigateWithIndex (index:Int)
    {
        val bundle = bundleOf("index" to index) //bundle에 인덱스 값을 넣어주는거다. index라는 이름에 index변수의 값을 넣어준다는 의미.
        navController.navigate(R.id.action_selectionFragment_to_resultFragment,bundle)
    }
}
새롭게 알게된 부분들
1. View.onClickListener 인터페이스를 이용해 onClick override.
2. onClick 함수에서 when 조건문을 사용해 현재 view를 받는다. 여기서 v?.id란 // v(view)의 id가 null이 아니면 다음 조건문을 실행하겠다는 의미. 따라서 각 조건문에따라 v.id가 option_1이면 navigateWithIndex(1) 실행 …
3. navigateWithIndex (index:Int) 함수란 bundle에 when조건문에 따라 값이 넣어지고 navController가 다음 view로 넘어갈때, bundle에 담긴 값도 같이 넘어간다.
ResultFragment 값 출력부분 구현
class ResultFragment : Fragment(){
    // TODO: Rename and change types of parameters

    var option = -1

    lateinit var navController: NavController
    override fun onCreateView(
        inflater: LayoutInflater, container: ViewGroup?,
        savedInstanceState: Bundle?
    ): View? {
        // Inflate the layout for this fragment

        option=arguments?.getInt("index")?:-1 //얘네가 null이면 -1을 반환, null이 아니면 bundle의 index값을 반환.
        return inflater.inflate(R.layout.fragment_result, container, false)
    }

    override fun onViewCreated(view: View, savedInstanceState: Bundle?) {
        super.onViewCreated(view, savedInstanceState)
        navController = Navigation.findNavController(view)
        btn_home.setOnClickListener{
            navController.navigate(R.id.action_resultFragment_to_mainFragment)
        }
        setResult(option) //bundle의 값이 option에 담김.

    }
    fun setResult(option:Int) //bundle에서 받은 값에 대한 조건문
    {
        when (option)
        {
            1-> {
                result_title.text= "You are QUITTER!"
                result_content.text = "You can let the person easily."
            }
            2->{
                result_title.text= "You are QUITTER!"
                result_content.text = "You become really clingy to your ex"
            }
            3->{
                result_title.text= "You should take it easy"
                result_content.text = "You can do crazy things no matter what it takes."
            }
            4->{
                result_title.text= "You are pretty mature"
                result_content.text = "You can easily accept the break-up"
            }
        }
    }
}
'Android > 공부' 카테고리의 다른 글
| [Android] 안드로이드 기본 dialog 생성하기 (0) | 2022.10.25 |
|---|---|
| [Android] Activity와 Fragment 생명주기 (1) | 2022.10.25 |
| [Android 오류] error: failed linking file resources (0) | 2022.10.12 |
| [Android] palette View 모음 (0) | 2022.09.29 |
| Kotlin 강좌 3강 : 심리테스트앱 만들기 - 22/07/07 (0) | 2022.07.07 |
